Most problems with a custom balloon order do not happen on the balloon. They happen in the half hour before you place the order, when a logo gets attached to an email with no thought about how it will be screened, sized, or registered on a curved surface that changes shape as it inflates. Getting that part right is the difference between a crisp imprint and a blurry blob that only your printer can love. This walkthrough covers the decisions a buyer actually has to make, in the order they come up.
The short version: pick a print method that matches the balloon material, decide how many ink colors you truly need, size the artwork to the printable window for that balloon, choose one side or two, and submit clean vector files. Do those five things and a balloon order is one of the easier promotional items to buy.
Screen print or digital: the method follows the material
Latex balloons are almost always screen printed. A rubber plate carries your design, ink is pressed onto the deflated or lightly inflated balloon, one color at a time. Screen printing uses spot inks, meaning each color is a specific premixed ink laid down through its own screen. It is fast, durable, and cheap at volume, but it is built for solid shapes and bold lines rather than photographs or subtle gradients.
Foil, or mylar, balloons are a different animal. Because the surface is a flat film before inflation, many suppliers now offer digital full-color printing on foil, which prints a photographic image or a multicolor gradient in a single pass with no per-color screens. If your brand mark is a two-color logo, latex is the natural home. If you need a full-color photo, a gradient, or a design with more than three or four colors, ask specifically about digitally printed foil instead of trying to force it onto latex.
How many colors you need, and why each one costs more
On screen-printed latex, every ink color is a separate screen that has to be made, mounted, and registered to line up with the others. That is why pricing jumps at each color count: a one-color imprint is the baseline, two colors is common and widely available, and three- or four-color spot designs exist but carry more setup and tighter registration tolerances. Small misalignment that would be invisible on a flat card becomes obvious when it stretches across an inflating sphere, so printers keep multicolor latex designs simple on purpose.
A practical rule: if your logo can be reduced to one or two solid spot colors without losing its identity, do that. You will pay less in setup, get faster turnaround, and avoid registration risk. Reserve full color for foil, where it is printed digitally and the color count does not drive the price the same way. Standard ink shows best on lighter balloon colors; a light ink on a dark balloon may need a specific opaque ink, so confirm ink choice against your balloon color rather than assuming any combination works.
Sizing artwork to the print area
Every balloon has a printable window, and it is smaller than people expect because a balloon is only printed on the flat panel that faces the press. Published spec sheets across the industry land in a consistent range. A 9-inch round typically prints inside about a 4.5-inch diameter, an 11-inch round around 4.75 inches, and 16- to 17-inch rounds roughly 6 inches high or wide. Only the big 36-inch balloons open up real estate, on the order of 12 inches tall by 15 inches wide. Heart shapes run smaller, near 4.75 inches on an 11-inch heart and about 7 inches on a 17-inch heart. Treat these as indicative; each manufacturer publishes its own exact template, and you should design to the one your printer sends.
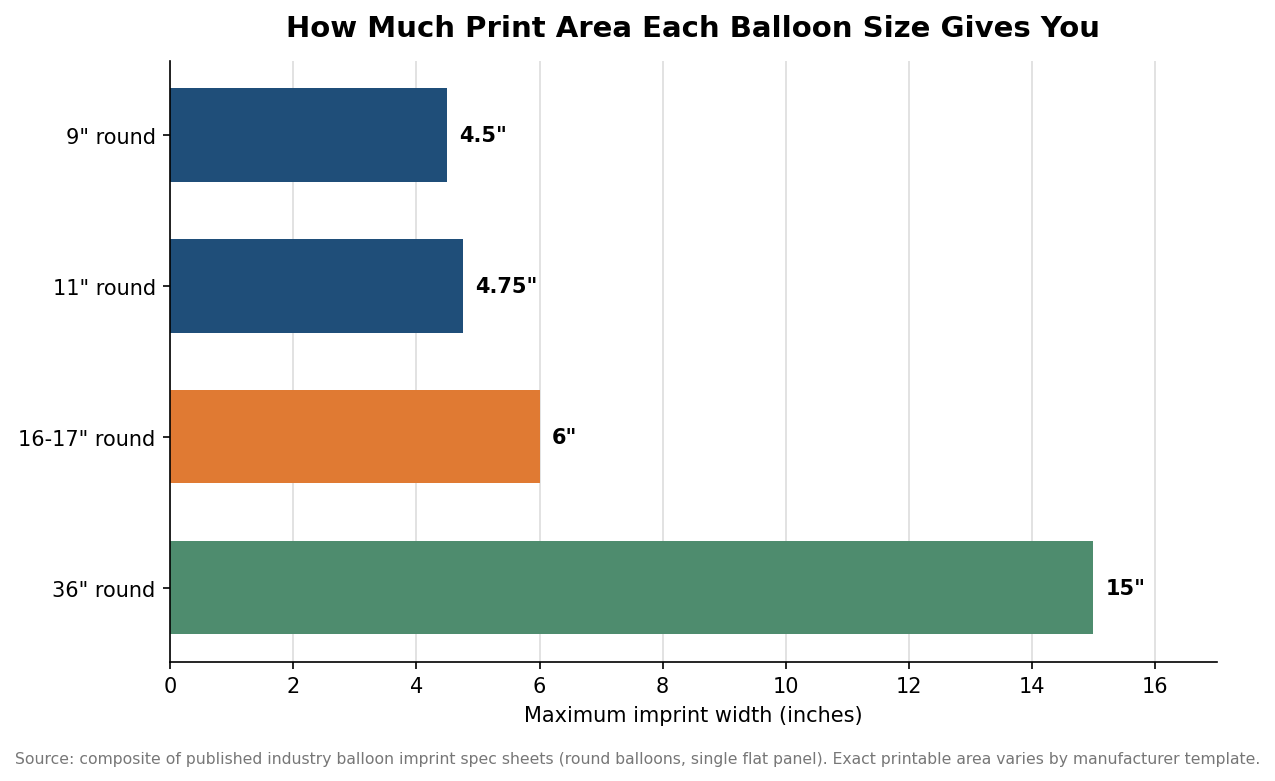
The second thing to understand about sizing is distortion. A balloon is printed flat or barely inflated, then the image expands with the balloon. Art that looks tight on the template spreads and lightens once the balloon reaches full size, which is usually what you want. The trap is underinflation: a balloon filled short of its rated size shows a shrunken, squeezed logo. If the display matters, inflate to the size the print was designed for. Keep copy to a few short lines, avoid tiny type, and give artwork room to breathe rather than cramming the window edge to edge.
One side, two sides, and the setup math
A one-side imprint is the default and covers most needs, since a balloon rotates freely and rarely faces a viewer for long. Printing the second side roughly doubles the press work and adds cost, quoted either as a per-balloon add-on on larger sizes or through a higher minimum on smaller ones. It is worth it for a stage backdrop or a photo wall where balloons are anchored and the back is visible; it is usually wasted on giveaways.
Beyond the sides decision, a few one-time and per-change fees shape the total. Screen setup is charged per design and varies by balloon size; changing an ink color mid-run can add a smaller fee; a second side adds a per-balloon amount on big balloons; and rush production carries its own charge. None of these are large individually, but they explain why a tiny reorder with a color tweak can feel disproportionately expensive. Your quote itemises any of these that apply to your design.
Minimums track balloon size and method. At Get Custom Balloons, orders start from 12 balloons; two-sided jobs and very large balloons can change the minimum, so your quote confirms it. Build your quantity around the event plus a spoilage cushion, because balloons do burst and a handful will be lost to inflation and handling.
File setup that prevents a reprint
The single most common cause of delay is artwork that is not production ready. Printers want vector files built in Illustrator or supplied as EPS or PDF, because vector art scales to the balloon template without pixelating. Convert all fonts to outlines or curves so the printer does not need your typeface, keep type at roughly 4 points or larger since anything smaller fills in on latex, and set lines and outlines to about 1 point or heavier so they survive the press. If you only have a raster logo, supply it at high resolution and expect the printer to recreate it as vector, which takes time and sometimes a fee.
Always approve a proof before production. On a curved, stretching surface, the proof is where you catch a logo that sits too low, a color that reads differently against the balloon than it did on your monitor, or copy that will distort at full inflation. Approving the proof also starts the production clock: standard production ships in about 2 weeks after approval, and faster turnaround is available with express shipping. Plan backward from your event date, add the proof cycle, and you will not be chasing a delivery the week of the party.
Specify the method to the material, keep the color count honest, design to the real print window, choose sides deliberately, and hand over clean vector files. That sequence is the whole job, and it is what separates an order that arrives looking sharp from one that arrives looking like a compromise.